Wednesday, December 22, 2010

My Best Ginger Cookies

I hesitate to share this recipe because I love it so much (and am therefore very protective), but I simply have to, because you'll love it so much.  It doesn't really need any further introduction, but I must give credit to The Joy of Cooking, which is the starting point for the quantities.


Ginger Cookies
yield: 5-6 dozen, depending on size

12 T unsalted butter, softened
1 2/3 c granulated sugar

2 large eggs
1/4 c dark molasses
1/4 c dark brown sugar
2 t lemon juice
1 t orange zest
1/2 t vanilla

3 3/4 c all purpose flour
1 1/2 t baking powder
1/2 t baking soda
1/4 t salt
4 t ground ginger
1 t cinnamon

1/2 c chopped crystallized ginger
1 T grated fresh ginger
granulated sugar, in a shallow bowl for rolling

Preheat the oven to 350F.  Line cookie sheets with parchment, or grease well.

In a stand mixer, or by hand, beat the granulated sugar with the butter until light and fluffy.  Add in the eggs, one at a time, then add the molasses, brown sugar, zest, lemon juice, and vanilla.  Combine the dry ingredients in a separate bowl and mix thoroughly.  Add into the butter mixture and mix until just combined.  Fold in the two gingers.

With a #40 scoop, or your favorite tablespoon measure, portion out the dough and drop it into the sugar.  Roll each piece until completely coated and rounded.  Flatten just a bit, then place on the cookie sheets about 1 1/2" apart.  At this point, the cookies can be frozen for up to one month.  Otherwise, slide into the oven and bake for 11 minutes (or longer if you like them crisp).

Monday, December 20, 2010

Quail Egg Canapes

If only I had some caviar!

I made these darling little amuse bouche for a cooking class that I taught at Bella Kitchen Essentials tonight.  The theme was a simple, elegant cocktail party- this was a little more complicated but I wanted to surprise the students with a little bite to start off the evening!  The method is straight from the CIA, but the addition of horseradish in the yolk mixture is my own twist.

Deviled Quail Eggs

yield: 18 finished canapes

10 quail eggs
1 T mayonnaise (approximate)
2 t prepared (not creamed) horseradish
Salt and white pepper to taste
2 lush sprigs dill
9 pumpernickel or rye cocktail toasts
1 T butter

Bring a small pot of water to a boil.  Lower the quail eggs in and simmer for six and a half minutes.  Immediately plunge into an ice bath.  Once they have cooled a bit, peel carefully (note: quail egg shells and inner membranes are much tougher than those of chicken eggs, so be firm but delicate).  

Halve the eggs, then gently scoop out the yolks.  Mix the yolks with the horseradish, salt and pepper and enough mayonnaise to create a very smooth paste.  Wipe the whites clean of any stray bits of yolk.

Take a circle cutter and stamp circles just slightly larger than the base of an egg half- you should be able to get two out of each toast.  Heat a small saute pan and melt the butter in it.  Fry the toast rounds until lightly crisped on both sides.  Remove from the pan, season with salt, and allow to cool completely.

With a piping bag fitted with a small star tip, pipe the filling into eighteen of the twenty egg halves.  With the remaining filling, create a base on the toasts to adhere the egg halves with.  You'll want a small mound to nestle the egg in to. 

Before placing the egg halves, select small fronds of dill and garnish each egg with one piece.  Set each egg half on one piece of toast.  The extra filling on the base should hold the egg in place.  Serve immediately!


Sunday, December 5, 2010

Easy Dinner Rolls

I know, it would have been nice had I made this post prior to you all preparing your Thanksgiving dinners.  I am very sorry and will continue to beg your forgiveness...

My go-to recipe for basic dinner rolls can be found here.  It's the base recipe for yeasted rolls on the King Arthur Flour website.  You could follow the recipe exactly, but here are the alterations that I routinely make:

1.  I use olive or canola oil instead of butter in the rolls
2.  Since I always have potatoes around but never potato flakes, I mash enough boiled potato to equal the volume and adjust the water a bit to compensate for the additional moisture
3.  I make eight giant rolls, and cram them all into one 9" pan

Saturday, November 27, 2010

Cranberry Pumpkin Bread

Cranberry Pumpkin Bread

based on The Joy of Cooking

1.5 c all purpose or white whole wheat flour
2 t ground cinnamon
1 t ground ginger
.5 t freshly ground nutmeg
1 t baking soda
.25 t baking powder
1 t salt

.33 c milk

6 T butter
1 c sugar
.33 c brown sugar
2 eggs
1 c pumpkin puree
1 t vanilla extract

2 c fresh cranberries
.5 c toasted pecans

Preheat the oven to 350F.  Grease and flour a 9x5" loaf pan.
Combine and sift your dry ingredients.  In a stand mixer, cream the butter and sugars until fluffy and well combined.  Beat in the eggs one at a time, then add the pumpkin puree and vanilla.  Once mixed, alternately add the dry ingredients and milk, beginning and ending with dry.  Fold in the cranberries and pecans, and transfer to your baking dish.  Bake until a pick inserted in the center comes out clean - about one hour.

Friday, November 26, 2010

Braised Duck Legs : Master Recipe

This year for Thanksgiving dinner my main course was braised duck legs over kale, parsnip puree, and curry beurre blanc with a brunoise of honeycrisp apple.  I want to share this duck leg recipe with you because it never fails and it always a crowd-pleaser (unless your crowd doesn't like duck, and then there's nothing I can do for you!).

Braised Duck Legs

Plan on one duck leg per person.

The night before you plan to serve the duck, trim and rub the legs.  Cut off any extra skin and fat (save these bits and render them out; duck fat is precious), then cut a clean line just below the ankle.  This is purely cosmetic; it allows the muscle and skin to retract in a tidy fashion.  If you're feeling very particular, you can then clean the end of the bone completely of skin. 

Next, rub each leg with a bit of salt and whatever flavorings you'd like.  This time I used some freshly ground curry powder, perhaps 1/2 t per leg.  Other good options are ras al hanout or herbs de provence.  It all depends on the flavor profile you're looking for.

Cover and refrigerate until you are ready to bake, then preheat your oven to 400F. 

In a roasting pan or baking dish, lay roughly chopped vegetables (onion, garlic, carrot, parsnip, celery, etc) about 1" thick.  You won't be eating these vegetables, they are purely to perfume the meat so they should mirror the other flavors on the plate. 

Pour in chicken stock until the vegetables are almost submerged, then lay the duck legs, skin side up, in a single layer.  Cover loosely, and place in the oven.  Immediately turn the heat down to 325F.  Allow to braise until fall off the bone tender - about three hours.

Directly before serving, remove warm legs to a broiler pan, and broil just until the skin is crisp.
 

Thursday, November 25, 2010

The Beginning of Thanksgiving Dinner

Freshly roasted curry spices for braised duck legs over parsnip puree!

I just thought they were pretty : )  They'll be ground down and used to season duck legs and make a curry emulsion.  The parsnip puree will be the base, with some sauteed kale and brunoise of honeycrisp apple.

Monday, November 15, 2010

Oh, Rice

I think, volume-wise, I eat more white rice than any other food.  I love basmati, arborio, glutinous, calasparra, jasmine, vialone nano, and so on and so forth.  I enjoy brown rice as well, but would probably loose my cool if I could no longer have each and every variety of white rice.

If you follow the rice train of thought, it would make sense that I really enjoy Asian food as well.  Europe uses a fair amount of rice, but not like many of the Asian cultures.  I realize that saying "I like Asian food" is kind of a big blanket, but I really don't discriminate.  I have a special place in my heart for every cuisine from Vietnamese to Burmese to Japanese.

Recently, I learned from a colleague how to make onigiri.
Not that it's super complicated, but in spite of my love of rice I hadn't come across them before.  Onigiri are simple hand made rice balls with various fillings inside or with garnishes folded into the rice.

To start, cook off some Japanese style medium grain white or brown rice (a good introductory rice for this would be Niko Niko Calrose).  While the rice is still warm, dip your hands in lightly salted water (or cheat like me and buy a $4 mold from the Japanese market, which you would brush with the saltwater).  Form the rice into balls or triangles, placing a dab of some pungent flavoring in the center.

Some typical fillings are umeboshi, kombu relish, bonito flakes or salted salmon.  Really, you could use anything intensely salty or sour to provide a counterpart to the rice.  And alternatively, you could fold in something like cooked salmon, green onions, or sesame seeds into the rice before shaping.

You can serve these immediately after shaping, or chill them for a bit.  At any rate, partially wrap each onigiri with a piece of nori right before serving.  It provides some extra flavor and a nifty handle.  You can put out some soy sauce, pickled ginger, or wasabi to accompany the onigiri if you must have something, but I like them plain.

Tuesday, November 9, 2010

Quite Possibly the Best Cake Ever

I've always been a fan of raw apple cakes.  My mother made a very tasty one when I was growing up and it was my favorite dessert.  It was even relatively healthy and could easily be made vegan.  It's definitely the best vegan cake I've ever had, and I still use her recipe when I simply need cake but have no eggs.

This, boys and girls, is not her recipe...  While hers is just as good, this one is loaded with butter and simply irresistible.  It is not vegan, and it is not healthy; I figure this is the uptown version of the down-home cake of my childhood.

The following recipe comes from Dorie Greenspan.  For those of you who don't know, she's a food writer and cookbook author who splits her time between the States and France.  Her recipes are reliable, approachable, and a great way to expand your baking prowess without having to break the bank on specialty ingredients.  The only changes I make are to cut the apples smaller and use brandy instead of rum.  Enjoy!

Marie-Hélène’s Apple Cake 

¾ cup all-purpose flour
¾ teaspoon baking powder
Pinch of salt
4 large apples (if you can, choose 4 different kinds)
2 large eggs
¾ cup sugar
3 tablespoons dark rum
½ teaspoon pure vanilla extract
8 tablespoons (1 stick) unsalted butter, melted and cooled

Center a rack in the oven and preheat the oven to 350 degrees F. Generously butter an 8-inch springform pan and put it on a baking sheet lined with a silicone baking mat or parchment paper.

Whisk the flour, baking powder, and salt together in small bowl.

Peel the apples, cut them in half and remove the cores. Cut the apples into 1- to 2-inch chunks.

In a medium bowl, beat the eggs with a whisk until they’re foamy. Pour in the sugar and whisk for a minute or so to blend. Whisk in the rum and vanilla. Whisk in half the flour and when it is incorporated, add half the melted butter, followed by the rest of the flour and the remaining butter, mixing gently after each addition so that you have a smooth, rather thick batter. Switch to a rubber spatula and fold in the apples, turning the fruit so that it’s coated with batter. Scrape the mix into the pan and poke it around a little with the spatula so that it’s evenish.

Slide the pan into the oven and bake for 50 to 60 minutes, or until the top of the cake is golden brown and a knife inserted deep into the center comes out clean; the cake may pull away from the sides of the pan. Transfer to a cooling rack and let rest for 5 minutes.

Carefully run a blunt knife around the edges of the cake and remove the sides of the springform pan. (Open the springform slowly, and before it’s fully opened, make sure there aren’t any apples stuck to it.) Allow the cake to cool until it is just slightly warm or at room temperature. If you want to remove the cake from the bottom of the springform pan, wait until the cake is almost cooled, then run a long spatula between the cake and the pan, cover the top of the cake with a piece of parchment or wax paper, and invert it onto a rack. 

Carefully remove the bottom of the pan and turn the cake over onto a serving dish.  Serve with lightly whipped cream if desired.

Wednesday, October 6, 2010

It Feels Like Cheating

This spring, my husband very enthusiastically covered every available inch of our property in raised garden beds.  Everyone said he was crazy.  And "geez, there's just two of you, how are you going to eat all that?"  Now, they're all jealous.  Really jealous.

It's now October, and we are so sick of eating zucchini, green beans, tomatoes and basil that we want to cry.  There are still perhaps twenty japanese eggplants on the vine and a full bed of potatoes that we're working our way through.  I haven't bought produce in months, and honestly, it feels like cheating.  It's a lot of work in bursts, but much less than we thought.

Tonight I just couldn't resist taking a photo of our dinner.  With the fall sunlight coming it, it really was picturesque.  We are having peruvian and yellow potatoes roasted with thyme and shallots, beet salad with walnut oil and sherry vinegar, and braised organic chicken thighs with tarragon, lemon, and honey.  Aside from the chicken and the dry goods, all of it came from the garden.
Before roasting...
Before eating...

Saturday, September 11, 2010

Reminders of Spring

I always thought of strawberries and rhubarb as quintessential spring flavors- peaking in June and a faded memory by the time summer ends.  Not so for me this year!  Here it is, approaching mid-September, and my strawberry patch has produced a goodly amount of fruit, and my friend's rhubarb plant needs thinning...
To bring these two ingredients together with a seasonally appropriate flavor profile, I decided to make a crisp (you know, crisp like a fall day etc).  I made the streusel with brown sugar, flour, blanched almonds (ground coursely), and some powdered ginger to give a little zing.

I'm going to refrain from posting a proper recipe because, to be honest, I estimated everything.  But, I will suggest a few ideas that will help keep your next crisp, well, crisp:

- choose your thickener wisely; flour takes longer to thicken and loose it's starchy flavor than refined starches (such as corn or potato) do, and the faster you can secure your liquid, the less soggy your topping will be.
- if you're using a high moisture item (like rhubarb), think about macerating it with some of the sugar for about an hour, then draining off some of the excess liquid.
- consider baking your fruit mixture for about twenty minutes before adding the topping; this will reduce the overall moisture content in the filling.
- make sure to use enough topping to make a rather thick layer; there will always be a soggy bit right next to the fruit, so if you want any crunchy bits, you have to put quite a bit

Wednesday, September 1, 2010

Urchin On My Hands

My hands are irreversibly stained.  The kitchen smells of the sea.  And everyone is full to the brim with luscious sea urchin.  Following are some photos of how to clean an urchin, and then my recipe for Sea Urchin En Cocotte.

First, you cut the shell.  At the top of the globe, there is a soft spot you can use to start the process.  Make sure to use sturdy kitchen shears- not a knife!  The shell of the urchin will dull a knife blade faster than you'd think possible.


You can either cut a round out of the top (the proper way), or cut down the side and split the urchin open (the faster way- especially if you're going to puree some of the roe).  This is what a peek at the roe is like:
Next, scoop out the roe with a spoon, then rinse in cold salt water to clean:


Now, you're ready for the recipe.

Sea Urchin En Cocotte
(all quantities are approximate)

two large sea urchins (about 2.5# total), cleaned
1/2 T shallot, finely minced
2 T heavy cream
1 T dry sherry
1 T butter
salt to taste
1 T chives, finely chopped
1 lemon
crostini to serve

1.  Preheat your oven to 500F.  Place two heavy ramekins in the oven to heat thoroughly.  
2.  Divide the urchin evenly in half- the pretty stuff and the less pretty stuff.  Keep the pretty stuff aside, and force the ugly bits through a medium sieve into a small saucepan.  Add the shallot, sherry and cream, and over low heat, bring just to the point where bubbles are starting to form around the edges.  Stir frequently and season to taste with salt.  
3.  When your sauce is ready and the ramekins are hot, add half of the butter to each ramekin (it should sizzle and melt very quickly).  Lay the remaining pieces of urchin in the hot butter.
4.  Spoon some of the hot sauce over each portion and return to the oven until just warmed.  Think of this as poaching, not baking.  It should only take about two minutes.  
5.  As soon as they come out of the oven, drizzle with a bit of lemon and sprinkle with chives.  Serve immediately with crostini.


Thursday, August 12, 2010

Honey Almond Frozen Yogurt

Alright boys and girls, what do you do when you went to Costco and bought two gallons of yogurt, and then just wasn't in the mood to eat it?


My solution, and I think it's a good one, is to make frozen yogurt.  Usually I make a fruit flavor, like strawberry or peach but this time I broke from tradition.  I had some wonderful raw, local, vanilla-bean infused honey from Sweet As Can Be honey farms.  It's tasty, and even if you never get as far as the frozen yogurt, this honey is worth the purchase (try it on french toast, seriously). 

I paired this honey with Disaronno amaretto, some toasted almonds, and thinly sliced peaches.  The yogurt serves as the base, the honey is a sweetener and emulsifier, the amaretto adds flavor and keeps the mixture from freezing too hard, and the almonds and peaches garnish the finished dessert.

Flavor wise, the vanilla in the honey enhances the essence of the peaches, and the peaches in turn bring out the flavor of the almonds.  Almonds and peaches are closely related so they're always a sure bet.

Honey Almond Frozen Yogurt 
(all measurements are approximate)

2 c yogurt
1/4 c honey
3 T almond (or other) liquor
peach slices and toasted sliced almonds to garnish

Whisk the honey and yogurt together, adjusting the sweetness to your taste- remember to make the mixture a bit sweeter than you want it because once it's frozen, the flavor will be dulled slightly.  Mix in the liquor and freeze according to your ice cream maker's instructions.

As a side note, if you wanted a more substantial dessert, put this over plain pound cake. 


Monday, August 2, 2010

Salmon, Leeks, and Butter

Baby Fennel and Leeks Braised with Vermouth and Cream
Wild Alaskan Sockeye Salmon with Minced Shallots and Garlic
Beurre Rouge with Tarragon and Fennel Seeds

For the leeks and fennel:
Thinly slice one leek and one small fennel bulb per serving.  Heat a small sauce pan and add a bit of butter.  Sweat the leeks and fennel for a few minutes, then add a hearty splash of white vermouth (and, heck, make yourself a martini while you're at it).  Add one sprig each of marjoram and thyme, then cover the pan and let the vegetables melt.  Once the liquid is mostly evaporated, remove the herbs, add in heavy cream just to cover and let reduce, uncovered until thick.  Season to taste with salt and lemon juice.

For the beurre rouge:
Take one cup of red wine, one thinly sliced shallot, a few peppercorns, two sprigs of tarragon and perhaps a teaspoon of fennel seeds and bring to a simmer.  Reduce until the wine is syrupy and infused with flavor.  Strain your reduction and set aside.  Directly before serving, warm the reduction and whisk in some room temperature butter, one teaspoon at a time, until the mixture is thick and you have at least two tablespoons of sauce per person.  Season with salt.

For the salmon:
Take one four to six ounce fillet per person and remove the skin and bones if needed.  Rub the fish with olive oil, minced shallot, minced garlic and salt.  Place on an oiled sheet pan and roast at 400F until cooked to your desired temperature.  I usually cook mine for six to eight minutes. 

Monday, July 26, 2010

Rosemary Olive Oil Cake


I serve it with yogurt mousse.  It's good with tea.  And that's all I have to say since there's one piece left calling my name.

Wednesday, July 21, 2010

6th Avenue: Round Four - Squash Blossom Quesadillas

Super simple, tasty, quick, great for kids, kids could even make them themselves... All common ways to describe a quesadilla, right? Well, we stepped it up a notch at the Tacoma Farmers Market demo this week.  I think this goes to show that quesadillas can be elevated to the adult level.

Last night I used an awesome semi-soft goat cheese from Blue Rose Dairy called Grande Rosa.  It has the texture and properties of mozzarella with a distinct goaty tone and it just melts beautifully.  This is the second cheese I've sampled from this dairy, and overall I'm very happy with their products.  I paired this cheese with some early corn, spring onions, and squash blossoms.

To start, I thinly sliced and then sauteed the onion in olive oil.  Once it was translucent, I added in the corn kernels, then the squash blossoms, coarsely chopped, right at the end.  I seasoned this mix with a little salt, and realized that I should have brought some ground cumin as well...

In another pan, I heated a bit of oil and started some corn tortillas toasting.  Once the tortillas were warmed through, I covered each one with slices of the goat cheese then perhaps a quarter cup of the corn mixture, and then a second tortilla.  As the bottom tortilla became crisp and lightly browned, I turned it just to finish cooking the second tortilla.

Sorry to say, I don't have a photo since the samples were devoured faster than I could imagine.

Tuesday, July 20, 2010

Spaghettini with Basil, Clams, and Squash Blossoms

Squash blossoms and basil signal summer for me.  We have perfect delicate basil leaves and every indication of a huge zucchini harvest to come.  With so many squash in our future, I have no regrets sacrificing a few blossoms for this dish:
I started out with about a cup of fresh basil chiffonade, eight coarsely shredded squash blossoms, two cloves of garlic, two thirds of a cup of grated parmesan, and some cream.  Once I had my mise en place ready, I steamed one pound of manila clams in some sauvignon blanc, picked them out of their shells, and reserved the cooking liquid.  While they were steaming, I cooked about half a pound of spaghettini no. 11 (De Cecco is a good brand).  After draining the pasta, I added the garlic, reserved clam liquor, and cream to the saucepot and let it reduce to a nice thick consistency.  I added the pasta back in with the basil, blossoms, clam meat and parmesan.  With a quick toss and a sprinkle of sea salt, this quick pasta made four great first course servings.  Is your mouth watering?  Mine certainly is.

Monday, July 12, 2010

Grilled Lamb Chops

Summer has finally started in the northwest!  I'm kicking off the season with a great recipe that appeared in the spring issue of Art Culinaire.  It's a plate composed of rosemary grilled lamb chops and mint-almond pesto over a sort of ragout of chickpeas with chard and roasted grape tomatoes.  I've been waiting for a sunny day to give this recipe a try.  Here's how it turned out:

Tuesday, July 6, 2010

6th Avenue: Round 3 - Crostini with Fava Beans, Chevre, Mint, and Lemon

After I finished the farmers market demo today, I did a mock up of the entire process for all of you that couldn't make it tonight.  The audience was very interested in many of the little steps so I thought I'd share them with you.

For this recipe you will need:

Fava beans
Fresh goat cheese
One lemon
A few leaves of mint
A baguette
One clove of garlic
Olive oil
salt and pepper
a pot of boiling water and an ice bath

Step 1:
Remove the beans from their pods:


Blanch the beans in rapidly boiling salted water for two or three minutes, until they are tender and their jackets split.  Immediately drain and shock in ice water.  They should look like this:


Step 2:
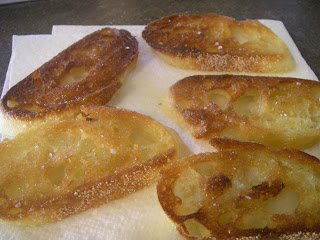
Make some crostini by slicing the baguette on a slight bias, then fry them in olive oil over a medium flame until they look like this:


Sprinkle with some salt, and rub with the garlic clove, then set aside to cool.

Step 3:
Take the beans out of their jackets and place on the cutting board.  Add a little bit of salt and pepper, a bit of lemon zest, and some thinly sliced mint.


Now, mince it up:


Step 4:
Assemble the crostini by spreading a bit of the chevre on each crostini (add a little bit of milk or cream to the cheese if it is too dry to spread easily), then spoon on some fava mixture.  Press lightly to help the topping stick to the crostini.


And you're done!  Serve with a crisp white wine, such as sauvignon blanc or sancerre, or a dry sparkling wine.

Monday, June 28, 2010

Last Minute Birthday Cake

At 2:00 on Sunday I received a phone call.  It was kind of a kitchen-style 911. 

Caller:  "Help!  I'm on my way to the outdoor store with my husband, it's his birthday, and I don't have time to make a cake!"
Me:  "Never fear!  I can make it happen in time for dinner if you'll let me raid your chocolate cupboard!"

(disclaimer: the caller is a very close friend of mine, who happens to live next door and keeps a ridiculous stash of Guittard chocolate)

The birthday boy loves him some chocolate- the last birthday cake I made for him was a plain sponge layered with a variety of chocolate mousses and I needed to do something different...  I didn't want to do chocolate on chocolate with a chocolate frosting, and I know that they enjoy coffee with dessert.  I decided on dark chocolate layers with a coffee-caramel mousse and a bittersweet chocolate glaze. 
 
Not bad for such short notice.
Oh, and check out the manly floral arrangement...

Thursday, June 17, 2010

Kale and Escarole

One of my favorite things to make with kale is the Portuguese soup caldo verde.  It's very popular in both Portugal and Brazil, and it should be popular here too!  I adapted this recipe for ingredients available in our area and to my taste from Leite's Culinaria:
~
Caldo Verde
1/4 cup olive oil
1 large onion, diced
2 cloves garlic, minced
10 ounces linguica or Spanish chorizo
6 waxy potatoes, scrubbed
8 cups chicken or vegetable stock
1 pound kale, washed well, center ribs removed, sliced very thinly
Salt and pepper to taste


In a large pot, heat the oil.  Once shimmering, add the garlic and onions, stirring frequently.  Add in the meat and once it is browned, add the potatoes, and then the stock.  Simmer gently until the potatoes are just tender.  At this point, you can remove some of the potatoes, puree, and then return to the pot for a thicker soup.  Stir in the kale, cook just to wilt, then season to taste with salt and pepper. 
This will produce about six hearty first course servings.
~
A couple of other things to try with kale (start all of these by washing, removing the rib, and finely slicing)-
saute and add to a fritatta with diced red peppers and cooked diced potatoes
finely shred and add to your favorite stir fry
saute with garlic and red pepper flakes, then add a splash of balsamic vinegar right at the end

Now, on to escarole...  This slightly bitter green can be used cooked or raw depending on the maturity of the leaves.  If the leaves are tender and pale, the best thing to do is gently wash the leaves, the tear them into bite sized pieces and use them as a base for salads.  Escarole goes beautifully with fennel, citrus fruits, and many cheeses (fresh goat or a nicely aged parmesan for example).  It will be important to dress the salad simply- perhaps just lemon juice, extra virgin olive oil, and chunky salt.  The flavor of young escarole can be easily lost in the fray.

If the escarole is more mature, sauteing in olive oil with garlic and finishing with some lemon juice and salt is my favorite way.  This preparation goes well with mild main courses such as roast chicken or pork tenderloin.  The larger leaves can also hold their own in soups- chicken, lentil, and white bean soups all compliment the subtlety of the greens.

Wednesday, June 16, 2010

6th Avenue : Round Two - English Pea Risotto

So here I am, in the middle of June, dodging rain drops to teach Tacoma Farmers Market-goers how to make yummy risotto.  Fortunately the sun came out for my demonstration this week so we had about fifty people watch at least part of the demonstration!  A few people stayed for the entire show - that always makes ya feel good!

I chose to make a traditional risotto garnished with english (shelling) peas; partially because peas are one of the first things to hit the market and partially because english peas rock my world.  We had gorgeous peas and spring Walla Walla onions donated by Bautista Farms out of Mabton, WA.  The guys at the booth were super sweet and besides, their produce kicked some serious behind when it came to quality and flavor.  Please support people like them- using their produce makes all the difference in the world.

English Pea Risotto

1 small leek
½ small onion, finely diced
3 T butter
1 c arborio rice
½ c white wine (optional)
4-5 c chicken or vegetable stock, held at a low simmer
1 c shelled English peas
1 c freshly grated parmesan
salt to taste

In a pot of boiling lightly salted water, blanch the peas until tender. Drain and shock in an ice bath.
Halve the leek, finely slice into ½ moons, then immerse completely in cool water, agitating to separate the pieces and allowing the grit to fall away. Gently lift the leeks out of the water and onto a towel to dry. Heat a medium saucepan over medium-low heat and melt the butter. Add the onion and leek, then sweat until very tender but not browning. Add the rice and stir for about one minute to coat each grain with the fat (this is called “parching”). Add the white wine at this point (optional), and stirring frequently, allow the wine to be absorbed. Then, add just enough stock to cover the rice grains, and stir frequently until most of the liquid is absorbed. Continue adding stock in this manner until the rice is tender to the bite (think like al dente pasta) but certainly not mushy! Fold in the the peas and parmesan, and adjust the consistency with the remaining stock if necessary- the mixture should be very loose and should not hold it's shape when spooned out. Season as desired.
yield: four servings

Tuesday, June 15, 2010

Bits From the Garden

My husband has always expressed an interest in gardening.  The progression/obsession started shortly after we met with a few tomato plants and some peas.  Now, almost ten years later he's gone completely nuts with it and has somewhere around fourteen 4'x10' raised beds covering our yard.  And that doesn't count the greenhouse full of tomatoes and peppers.  Oh, or the mounds out past the deck full of zucchini plants.

Since our summer has gotten off to a rather slow start, we are still stuck in the salad-and-greens phase of things.  I'm not complaining, mind you!  We've got four different kinds of head lettuce (it hasn't been warm enough to make it bolt and go bitter...), a very pungent variety of wild arugula, two varieties of kale, and "bright lights" swiss chard in colors that ought not appear in nature.  And don't forget the radishes.  We're on our fourth harvest of french breakfast radishes.  Give me a few more days and I'll never want to see a radish again...

A few nights ago I set out to make a salad for dinner but didn't have much to gussy up the plain lettuces, so I decided to take bits and pieces from most of the plants...  We had red and green leaf lettuce, wild arugula, and baby kale and chard leaves as the base.  To bring some excitement, I added marjoram, thyme, fronds from carrot tops, pea tendrils, blossoms from rapini that was far too young to be flowering, and radish roots and leaves.  I topped it off with some Bulgarian sheep's milk feta, sherry vinegar, Spanish olive oil, and brined olives.  Somehow, it's more satisfying when you grow it yourself.

Wednesday, June 9, 2010

June 1st - Opening Night at the 6th Ave Market

Last Tuesday was the first night of the 6th Avenue Farmers Market in Tacoma...

We selected a dish highlighting the produce that this season has to offer: greens.  I prepared a salad of local baby greens from Terry's Berries; a wonderful mixture of colors, textures and flavors including everything from lettuces to baby kale and chard.  To that, I added the first of the season strawberries (also from Terry's),  Willapa Hills Big Boy Blue (a cow's milk cheese, aged at least 90 days with the influence of Roquefort cultures), and then dressed the whole lot with a honey-balsamic vinaigrette.  The honey, by the way, came from Sweet As Can Bee Honey Farm.

Next week, I will be demonstrating risotto but in the meantime, make yourself some salad.

Salad of Baby Greens, Strawberries, Blue Cheese, Honey Balsamic Vinaigrette

6 oz baby greens (arugula, mixed greens, baby lettuces)
1 pint strawberries
½ c blue cheese, crumbled
2 T balsamic vinegar
¼ c extra virgin olive oil
1 T honey
salt and pepper to taste

Wash and gently dry your greens and berries. Remove the stems, then slice or quarter your berries. Divide the greens, then the berries and blue cheese onto six salad plates. In a small bowl, whisk together the honey and balsamic vinegar with a pinch of salt and pepper. Slowly drizzle in the oil, whisking constantly to form an emulsion. Dress each salad lightly and serve immediately.
Great additions to this salad would be toasted pine nuts or candied citron.

Saturday, March 27, 2010

The Tacoma Farmer's Market

This year, during the busiest season of the catering business, I am taking on an extra project.  Crazy, I know!  I am going to be the demonstration chef for the 6th Ave Market this year- on the first and third Tuesdays of each month, beginning June 1st and running through Sept 28th.  The demos are going to start at 5:30p and run for a maximum of half an hour, with tastings at the end of each little show.  It's going to be loads of fun!  Also, I am going to do my best to post the recipe and information about the seasonal ingredient after each session.

There are many reasons that I am excited about taking on this volunteer position, the main ones are that I get the opportunity to work with absolutely the best and freshest ingredients, and I get to share my knowledge with the attendees of the market!  One of our goals is to educate people on how to utilize some of the less popular produce, and bring new ideas for the commons items.  Another thing that excites me greatly is the involvement of the farmer's market in the lower-income sector of the population.  This is the first market I've come across that takes food stamps, has a proactive approach towards gleaning for the food bank, and has a nutrition program.  

Here is the link to the TFM website:
http://www.tacomafarmersmarket.com/Default.aspx

Monday, March 22, 2010

The Macaron

It's the new rage.  It's delicious.  And unless you live next to a fantastic patisserie, you probably can't find a good one.  There are recipes all over the blogs, and I am here to provide you with yet another method to help you figure out this little bit of cookie madness!  The ingredients are pretty much always the same, in similar proportions, with similar methods...but it seems that everyone has their own little twist...

A macaron is a traditional French cookie made popular by Pierre Herme, a seriously famous pastry chef in Paris that deserves every bit of his acclaim.  The outer shell is essentially a meringue enriched with almond flour.  It is often colored to give a hint of what the filling is.  Fillings range in every flavor from fruit preserves to flavored ganache.  My most successful fillings so far are Meyer lemon curd and white chocolate-lavender.

Macarons (yield 36 sandwiches)

Before you start, make sure that you have ready four regular sized cookie sheets lined with parchment or (preferably) Silpat baking mats, an accurate candy thermometer, and a piping bag fitted with a medium round tip.  Also, this recipe is a prime example of the need to have your mise en place organized and ready to go prior to embarking on your macaron journey.

Step 1:

150 g almond flour (you can grind blanched slivered almonds in a coffee grinder and sift through a very fine sieve)
150 g confectioners sugar (sifted, unless you are grinding your own almonds, in which case you should grind some of the sugar with the nuts to keep them from caking)

Sift these two ingredients well, and set aside combined.

Step 2:
100 g egg whites (aged at least 24 hours and up to 48 hours at room temperature- they won't spoil)
35 g granulated sugar


In a very clean mixing bowl, start beating the whites on low speed until frothy, then slowly add the sugar and whip until soft peaks form.

Step 3:

150 g granulated sugar
50 g water


While your meringue is whipping, heat the sugar and water to 110C/230F.  This will be just a few moments after the mixture turns completely clear.  It is very important to have the whites at soft peaks when the mixture reaches temperature because if you heat the sugar too long, it will create too firm of  a meringue.  With the mixer running on low speed, gently drizzle in the hot syrup, then bring the speed up to medium and whip until cooled a bit and the meringue holds a good shape, at least thirty seconds.  For those of you new to meringues, this is considered an Italian meringue.  

Step 4:

Fold the almond flour and confectioners sugar into the meringue.  If you wish to add any colorings, now would be the time to do it.  Continue to fold until the mixture is homogeneous and the texture is such that any distinct shapes melt into the batter in 30 seconds.  If the meringue is too firm, the cookies will come out more button shaped, and if the meringue is too thin, well, just make sure you don't over mix it or you will end up with sweet crackers.  Many recipes describe this as the consistency of "magma," if this helps you, great, but I didn't have any magma around to compare with.

Step 5:
Immediately, put batter into piping bag and pipe quarter sized disks onto the baking sheets, leaving about 1/2" between each one.  They don't expand much, but they do need room for the air to circulate around.  After piping, set them in a safe place for at least one half but up to two hours so they can form a kind of shell.  When you are ready to bake, preheat your oven to 310F for convection, 330F without.  This is where your intimate relationship with your oven gauge comes in handy, because every oven is just a little different, and it may take a few tries to get the baking bit just right.  Once in the oven, bake for five minutes, then rotate and bake for perhaps two minutes more.  Remove from the oven, let cool for a couple of minute on the Silpats/parchment, and then gently place them on cooling racks to finish.  Once they're cool, fill with whatever suits your fancy- buttercream, ganache, jam, nut pastes.

Tuesday, February 2, 2010

Zaletti

Zaletti are one of the many traditional Italian dishes based on corn; the word "traditional" in this case always makes me smile since corn wasn't present in Europe until after the introduction of food sources from the Americas.  Once corn came to northern Italy in the mid 1500's, all sorts of wonderful dishes arose- soft savory polenta, olive oil and polenta cakes, and, my dear, zaletti.

Originally developed in the region around Venice, the  combination of corn and lemon pays tribute to the trading history of the area while staying true to the textures and flavors expected from European baked goods.  This cookie is lightly sweet with a distinct toothsome texture unique to cornmeal products.  They are equally fantastic with tea, espresso, and sweet wine.   

The dough is made of a combination of fine polenta (American cornmeal works just fine) and all purpose wheat flour, with a bit of sugar and leavening.  It is then enhanced by the combination of plumped dried currants and lemon zest.  Depending on your liquor cabinet and personal taste, the currants can be plumped with water, brandy, grappa or any other liquid you have on hand.  Each option will give a slightly different flavor- today I moistened my currants with Cointreau to play off of the citrus notes in the lemon zest.  Here is the link to my favorite zaletti recipe : http://www.babbonyc.com/dolci-zaletti.html  

Tuesday, January 26, 2010

My Secret Obsession

I don't admit this very often, but I am completely and utterly mad about bread and butter.  If some law ever came into effect that I could only eat one thing, that would probably be it.  Sushi is a worthy contender, but in the long run, I would probably have to go with the bread.  I'm not talking about Wonderbread here.  Not sliced bread, and not even the stuff "baked" fresh daily at Costco.  I mean that real, honest artisan loaf with that toothsome yet tender crumb, really well defined crust, and the complex aromas from sourdough or a good long preferment.  And butter; that's a whole separate topic for discussion.  Salted or not?  Goat or cow?  Oh, I could go on for pages...

This fascination really started during childhood, with my mother baking the majority of our bread.  It wasn't particularly complex, but it was fresh, smelled incredible, and instilled a lifelong appreciation for fresh loaves.  Perhaps six years ago, I bought the book Artisan Baking Across America, by Maggie Glezer (which I would highly recommend to anyone).  This book has had a huge impact on the quality of my bread.  Both my husband and I have always baked, but the recipes we used were always pretty rudimentary.  Since this book came into our home, we have been teaching ourselves how to bake and have consistently produced beautiful loaves worthy of the best bakeries in the area.  So, this gorgeous loaf was the product of yesterday's labors:


The method for this loaf isn't particularly complicated; it has a preferment (a small percentage of flour and water combined with yeast and allowed to ferment for many hours to develop flavor and build up the yeast) which is then added to the standard flour/water/salt combination, but this is where the recipe diverges from standard lean doughs.  This loaf has just a touch of honey and about three ounces of mashed potato.  Also, the preferment is the only source of leavening; generally when using a preferment, more yeast is added when putting together the final dough.  So the low yeast content (effectively 1/3 of 1/4 teaspoon for this one loaf), a high percentage of water, and some added sugars resulted in a fairly sloppy dough and a very long proof time.  I have to tell you though, the result was worth it.  I ended up with a thick, well developed crust, beautiful pale golden crumb, and an aroma to die for.  And yeah.  I ate it with butter. 


Wednesday, January 20, 2010

A Memorial

Perhaps a six weeks ago a good friend of mine called me up to see if I'd be interesting in volunteering for a Martin Luther King Jr memorial service in Tacoma.  I thought, sure, why not, it'll be a fun experience, right?  I was going to be in charge of setting a menu for and executing a sort of cocktail hour-minus-the-cocktails reception after the two-hour performance. 

There were a few restrictions on the menu which made the development process a good challenge.  First off, the group organizing the event wanted everything vegetarian (I can't tell you how many people asked me "where's the fried chicken?").  Next, this was the first year providing food after the service, so it was kind of sketchy how many people would hang around after for a snack (anywhere from zero to three hundred fifty).  Recruited to help me were five (even though it turned out closer to ten) high school students looking for some community service hours.  Last but not least, kitchen space and storage logistics turned out to be rather difficult.  We had limited access to the kitchen at the event site so we had to scrounge a bit...

So, the menu had to be vegetarian, very inexpensive, easy to execute so my enthusiastic but untrained assistants could actually have something to do, and all of the food had to be able to be made the day ahead, stored, and then all served at room temperature with minimal assembly.  This is what I came up with:

 Fig, Gorgonzola, and Walnut Crostini
Goat Cheese and Tapenade Crostini
Vegetarian Antipasti
(agrodolce pearl onions, roasted red bell peppers with sun dried tomatoes,
marinated wild mushrooms, olives with fresh herbs)
Spiced Grilled Eggplant and Cucumber Salad
Tunisian Carrot Salad with Toasted Cumin and Parsley
Cannellini Bean and Rosemary Spread
Labneh with Sumac, Olive Oil and Fresh Herbs

Not exactly what one might think of considering the occasion, but it worked within the constraints of budget/skill levels/kitchen coordination.  In the end though, everything worked out very well.  We ended up feeding perhaps one hundred fifty people with just a bit of leftovers.  All of the guests enjoyed the food, even if I was accused of "making them eat this healthy stuff."  The biggest seller was the fig crostini, I think people really enjoyed the sweet versus savory in every bite.  It was definitely new food for the highschoolers (a long way from top ramen, they pointed out) and it was for many of the diners as well.  It was a great opportunity to introduce a group of people to new flavors and textures in a very gentle manner. 


Monday, January 11, 2010

A Little Bit of Tuscany

After a couple of gloriously sunny days, we're back to winter weather in the Puget Sound.  It's gray, misty, and pouring rain.  To counteract this dreariness I wanted something for lunch that was bright and the complete opposite of what's going on outside.  After digging around in the cupboard, this is what I came up with:


When we were in Italy last year we stayed in Lucca for a few days, unaware upon arrival that the area is know in particular for it's olive oil and farro.  We ate farro in many forms- in soups and chilled salads mainly.  This farro salad is my take on what we ate almost every day there.

Grilled Squid and Farro Salad
three to four first-course servings

1 c. farro
6-7 squid, cleaned
1 small clove of garlic, finely minced
1/4 c. minced fresh parsley
juice of 1/2 lemon
1/3 c. extra virgin olive oil, unfiltered if possible
salt and pepper to taste

Simmer the farro in salted water until tender (usually about 15 minutes, but check frequently).  Drain well and then dress immediately with the lemon, garlic, and olive oil.  Set aside and allow to cool to room temperature.  Meanwhile, heat a grill pan (or other grill) and lightly oil and salt the squid.  Once the pan is very hot, throw the squid on and cook for about 30 seconds.  Turn each piece and cook for about 10 seconds longer.  Remember that squid is best cooked either very quickly or very slowly; in between and it will be like eating fishy bubble gum.  Remove the squid from the grill and add in to the farro.  Add the parsley and season to taste with the salt and pepper, and feel free to add more oil and lemon to suit your palate.  As a side note, I think next time I will serve this on a bed of wild arugula.